Continuum Economics
  • Search
  • About Us
  • Buy
  • Invite A Friend
  • My Basket
  • Articles
  • Calendar
  • Forecasts
  • Events
  • Data
  • Newsletters
  • My Alerts
  • Community
  • Directory
  • About Us
  • Buy
  • Invite A Friend
  • My Basket
  • Articles
    • All
    • Thematic
    • Tactical
    • Asia
    • EMEA
    • Americas
    • Newsletters
    • Freemium
    • Editor's Choice
    • Most Viewed
    • Most Shared
    • Most Liked
  • Calendar
    • Interactive
      • China
      • United States
      • Eurozone
      • United Kingdom
    • Month Ahead
    • Reviews
    • Previews
  • Forecasts
    • Forecasts
    • Key Views
  • Events
    • Media
    • Conference Calls
  • Data
    • Country Insights
    • Shadow Credit Ratings
    • Full CI Data Download
  • Newsletters
  • My Alerts
  • Community
    • FX
    • Fixed Income
    • Macro Strategy
    • Credit Markets
    • Equities
    • Commodities
    • Precious Metals
    • Renewables
  • Directory
  • My Account
  • Notifications Setup
  • Account Details
  • Recent Devices
  • Distribution Lists
  • Shared Free Trials
  • Saved Articles
  • Shared Alerts
  • My Posts
Published: 2025-07-10T06:53:55.000Z

Chart AUD/JPY Update: Room for further gains

byPakLai Ng

Technical Analyst
1

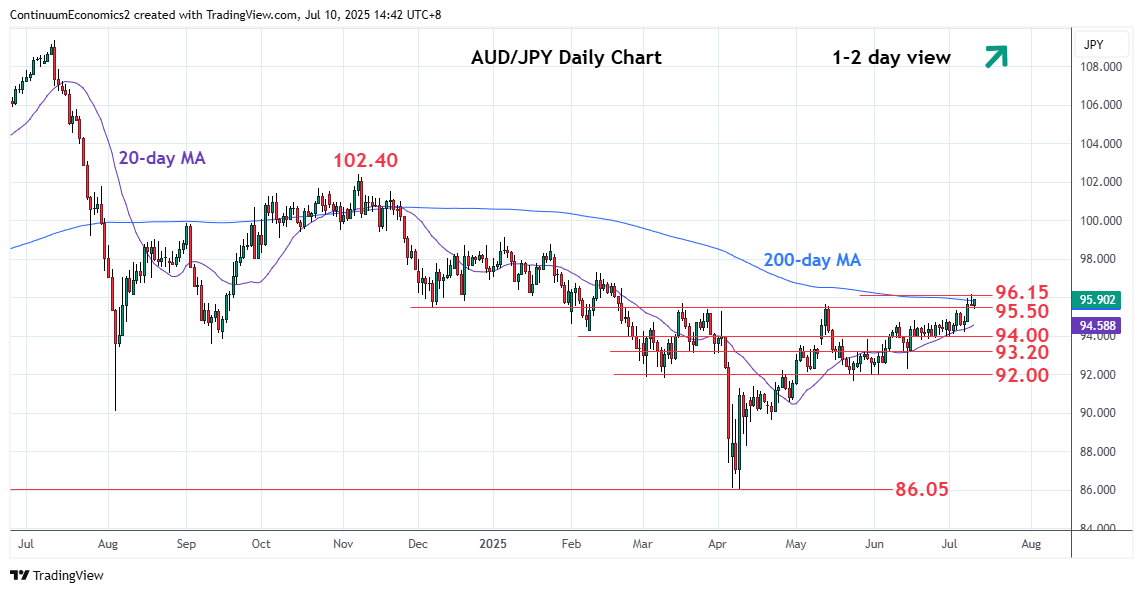
Settled back from test of the 96.15, 61.8% Fibonacci level, as prices consolidate strong gains from the 92.00/91.65 support

 LevelsImpComment  LevelsImpComment
R498.00*congestion S194.80*17 Jun high
R397.30*Feb high S294.00*congestion
R297.00*congestion S393.20*congestion
R196.15*61.8% Nov/Apr fall S492.30/00**13 Jun low, congestion

Asterisk denotes strength of level

06:50 GMT - Settled back from test of the 96.15, 61.8% Fibonacci level, as prices unwind overbought intraday studies and consolidate strong gains from the 92.00/91.65 support. However, bullish momentum from the latter keeps pressure on the upside anc clearance here will see room to target the 97.00 congestion then 97.30 February high. Meanwhile, support is raised to the 94.80/94.00 congestion area which should underpin. Would take break here to fade the upside pressure and open up room for deeper pullback to the 93.20/93.00 support. 

Continue to read the article for free
Login

or

or

Topics
AUD/JPY-TA
DM-Technical
Technical Analysis

GENERAL

  • Home
  • About Us
  • Our Team
  • Careers

LEGAL

  • Terms and Conditions
  • Privacy Policy
  • Compliance
  • GDPR

GET IN TOUCH

  • Contact Us
Continuum Economics
The Technical Analyst Awards Winner 2021
The Technical Analyst Awards Finalist 2020
image